• Other Fluke companies:
  • Fluke
  • Fluke Biomedical
  • Fluke Networks
  • Fluke Process Instruments
See more Fluke brands
Accelix Amprobe Beha-Amprobe Comark Emaint Landauer Pacific Laser Systems Pomona RaySafe Schad
Home
Precision, Performance, Confidence.
Fluke Calibration: US
  • Register
  • Log in
  • Contact Us

US - English [Change]


How to remove additional errors when calibrating resistance

Getting the most accurate resistance measurement on a multimeter depends on how you connect your calibrator to your multimeter as well as what kind of multimeter you’re working with. Learn the four different connection methods and the tool settings to measure and test resistance on a digital handheld multimeter, a bench multimeter, and a systems multimeter. Whether you connect one set of test leads or two and how the setup is done, you can compensate for additional resistance on your leads and get a more accurate measure of your tool’s calibration.

1. The 2-wire connection measurement method

Tools needed

  • Known source of resistance (calibrator)
  • Multimeter under test
  • 1 set of test leads

Steps for 2-wire connection method

  1. Connect test leads from the calibrator output to the multimeter’s input terminals.
  2. Turn your multimeter on to the Ohm setting.
  3. Set your calibrator to source 10 Ohms.
  4. Press Operate.
The 2-wire connection measurement method is the same process for handheld, bench, or system multimeters.

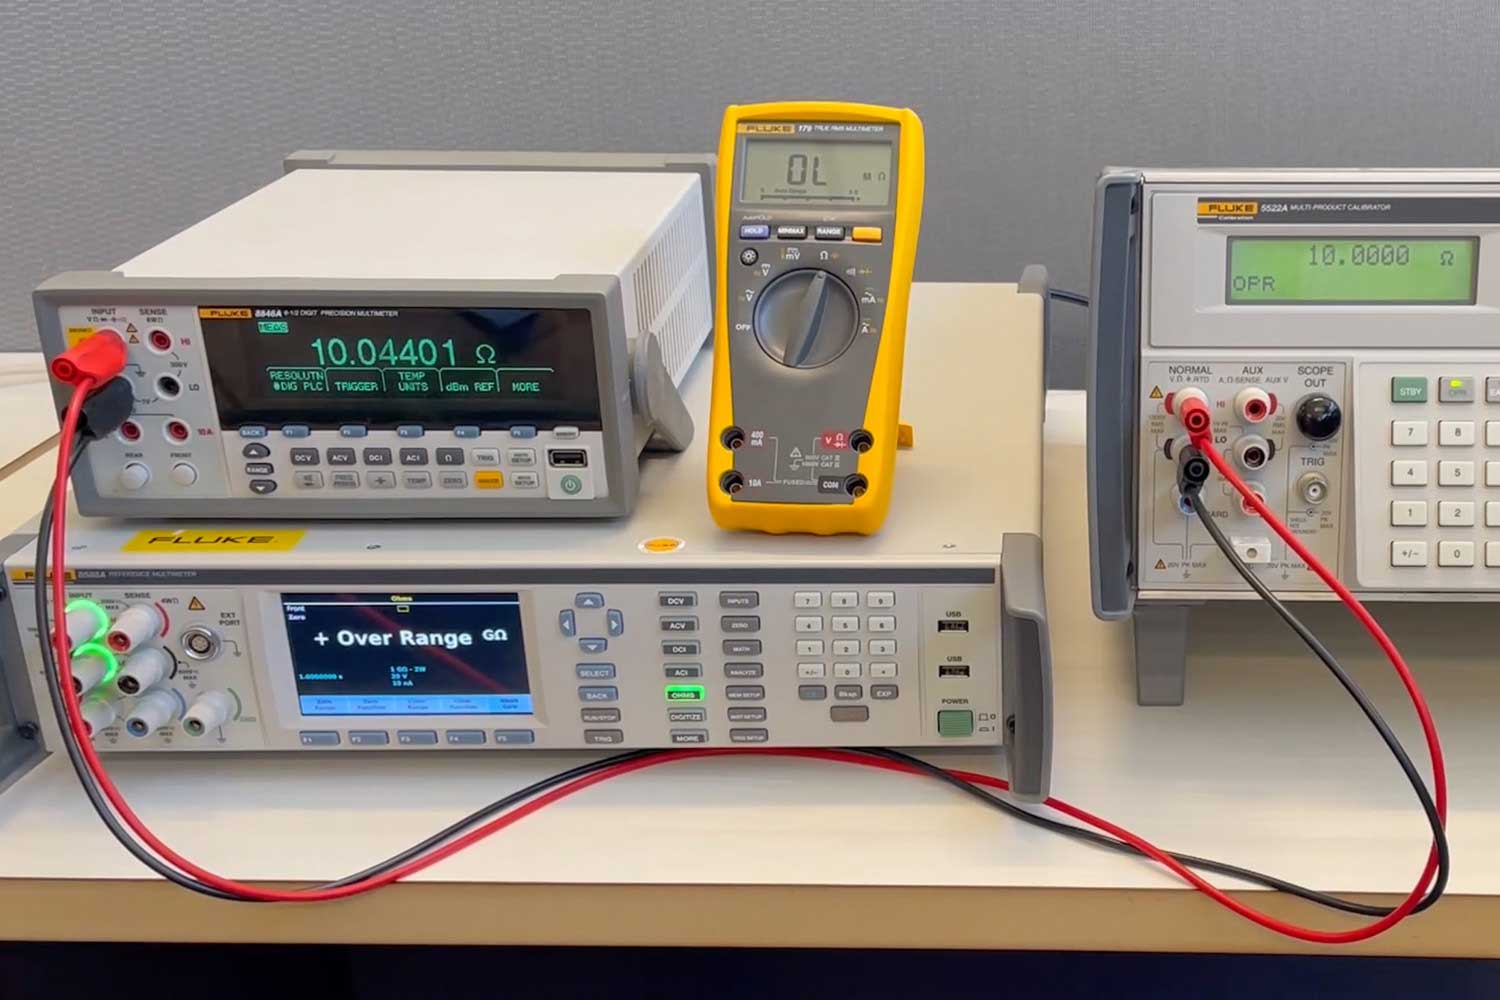
What’s happening at this point is the multimeter is sourcing current through the test leads to the calibrator – and the calibrator is measuring that current and supplying enough volts coming back to get the multimeter to read the Ohms output.

The same process works for a handheld digital multimeter, a more precise bench meter, and an incredibly precise systems multimeter. However, the measurement each kind of multimeter gives you is likely going to be a little bit off from the 10 Ohms coming from the calibrator. The reason for this is because the test leads have their own resistance that’s being added to your measurement.

2. The laboratory grade 4-wire connection measurement method

Tools needed

  • Known source of resistance (calibrator)
  • Multimeter under test
  • 2 sets of test leads

As the previous method showed, each of the resistance measurements showed slight errors or inflated Ohms measurements. One way to remove this error is by adding another set of test leads to the steps to compensate for the resistance in the test leads.

Many handheld multimeters do not support this kind of 4-wire connection, but more accurate bench or systems multimeters usually do.

Steps for 4-wire connection method

  1. Connect test leads from the calibrator output to the multimeter’s input terminals.
  2. Connect a second set of test leads from your multimeter to the calibrator’s standby terminals, matching the polarities.
  3. Tell your calibrator you have a 4-wire connection.
    1. Press the COMP button, select 4-wire COMP.
  4. Turn your multimeter on to the Ohm setting.
  5. Tell your multimeter you have a 4-wire connection.
    1. Under Ohms menu there is a 2-wire and a 4-wire setting. Select 4-wires.
  6. Set your calibrator to source 10 Ohms.
  7. Press Operate.
The laboratory grade 4-wire connection measurement method works for most bench and system multimeters.

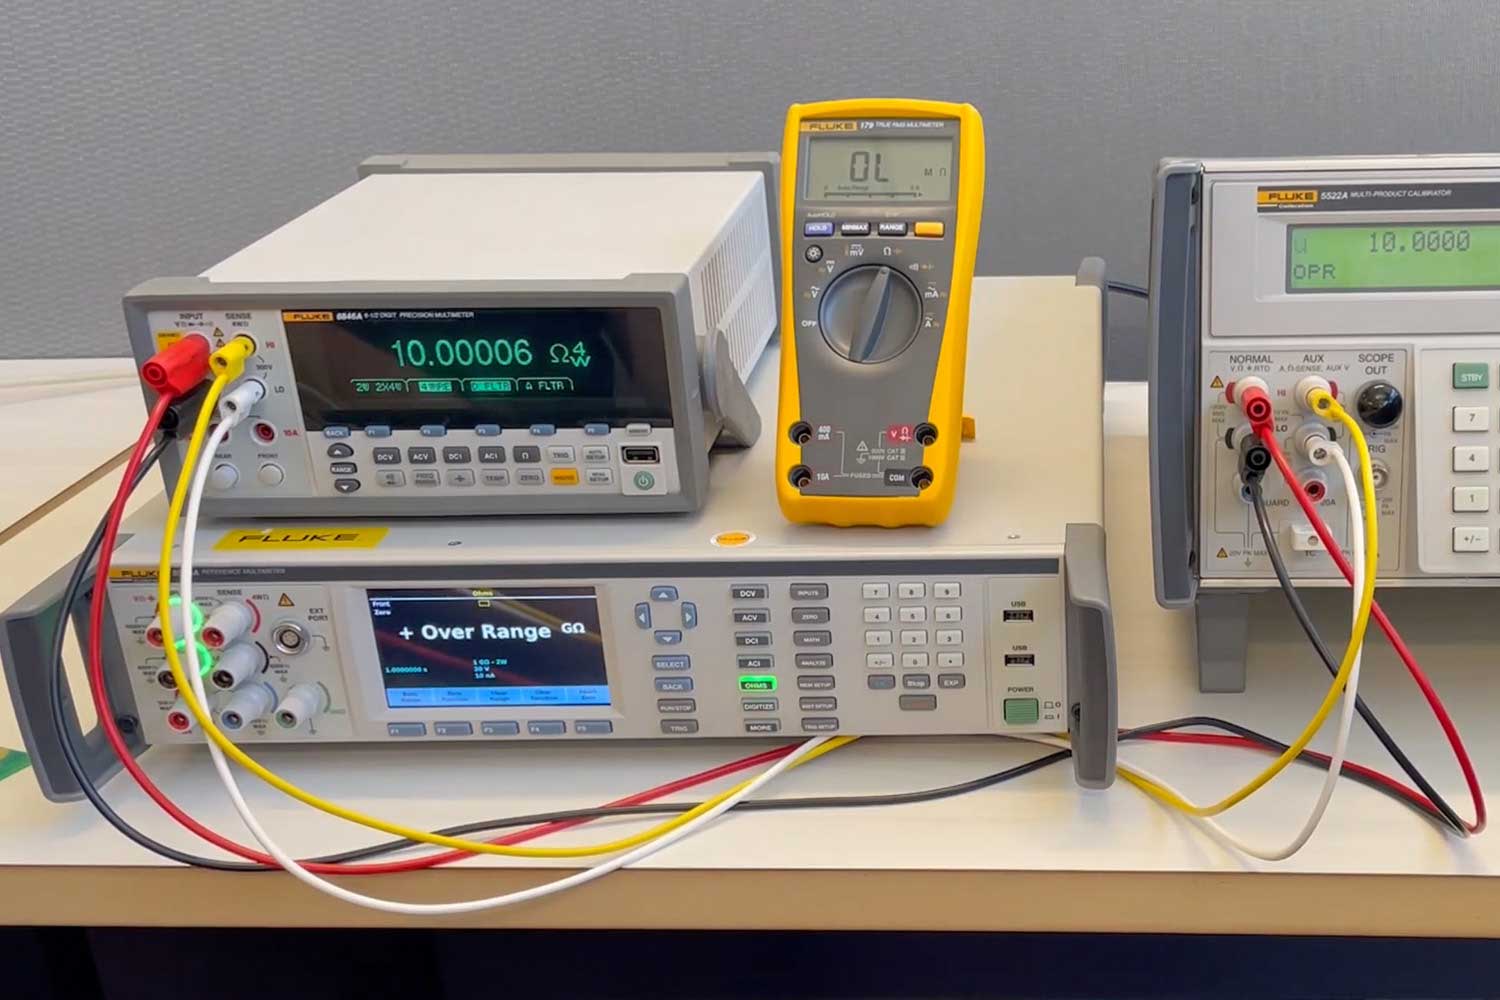
This 4-wire setup allows you to compensate for lead resistance errors in a resistance measurement. The measurements you see from your multimeters should be much closer to the 10 Ohms the calibrator is outputting.

Watch the active resistance on-demand webinar to see the tests in action.

3. The 2-wire connection method for handheld multimeters

Handheld multimeters often don’t support the traditional 4-wire connection setup, so this connection setup offers a different way to similarly compensate for the resistance in test leads.

Tools needed

  • Known source of resistance (calibrator)
  • Multimeter under test
  • 2 sets of test leads with stackable connections

Steps for 2-wire connection for handheld multimeters method

  1. Connect test leads from the calibrator output to the multimeter’s input terminals.
  2. Connect a second set of test leads to the stackable connections (on top of) on the multimeter’s leads.
  3. Connect the second set of test leads to the calibration’s standby terminals.
  4. Tell the calibrator it’s running a 2-wire compensation connection.
    1. Press the COMP button, select 2-wire COMP.
  5. Turn your multimeter on to the Ohm setting.
  6. Set your calibrator to source 10 Ohms.
  7. Press Operate.
The 2-wire connection method works for calibrating resistance in handheld multimeters.

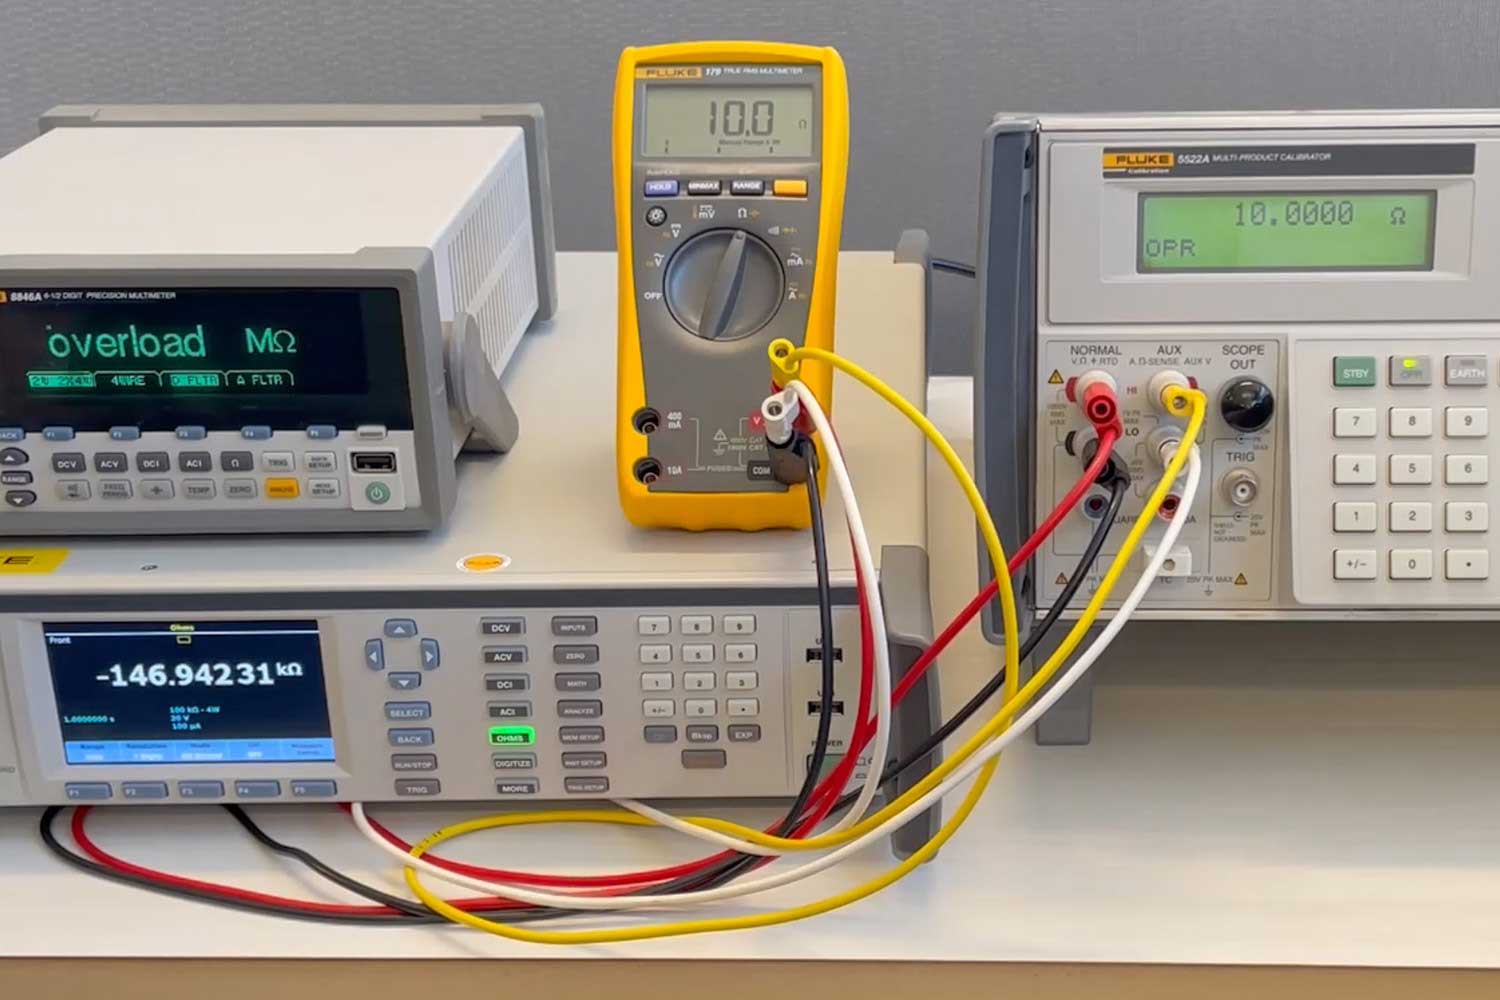
The digital multimeter will be sourcing current and measuring voltage, but the calibrator will be measuring the current on the normal terminals and sourcing voltage across the second set of test leads to measure voltage at the terminals on the multimeter. This compensates for any losses across the test leads.

Running a resistance measurement this way, you’ll see a more accurate result from your handheld multimeter. The additional resistance from the test leads is removed from the measurement.

4. The TruOhms or current reversal resistance connection method

These kinds of setups aren’t needed as regularly; they’re most useful in situations or locations with large temperature gradients or quick temperature changes. This is another 4-wire compensation setup, but the multimeter does the compensation instead of the calibrator. This measurement type will only work with very specific system multimeters, like the 8588A Reference Multimeter.

Tools needed

  • Known source of resistance (calibrator)
  • Multimeter under test
  • 2 sets of test leads

Steps for TruOhms method

  1. Connect test leads from the calibrator output to the multimeter’s input terminals.
  2. Connect a second set of test leads from your multimeter to the calibrator’s standby terminals, matching the polarities.
  3. Tell your calibrator you have a 4-wire connection.
    1. Press the COMP button, select 4-wire COMP.
  4. Turn your multimeter on to the Ohm setting.
  5. Tell your multimeter you have a 4-wire connection.
    1. Under Ohms menu select 4-wire True.
  6. Set your calibrator to source 10 Ohms.
  7. Press Operate.
The TruOhms or current reversal resistance connection method needs to be run with a system multimeter.

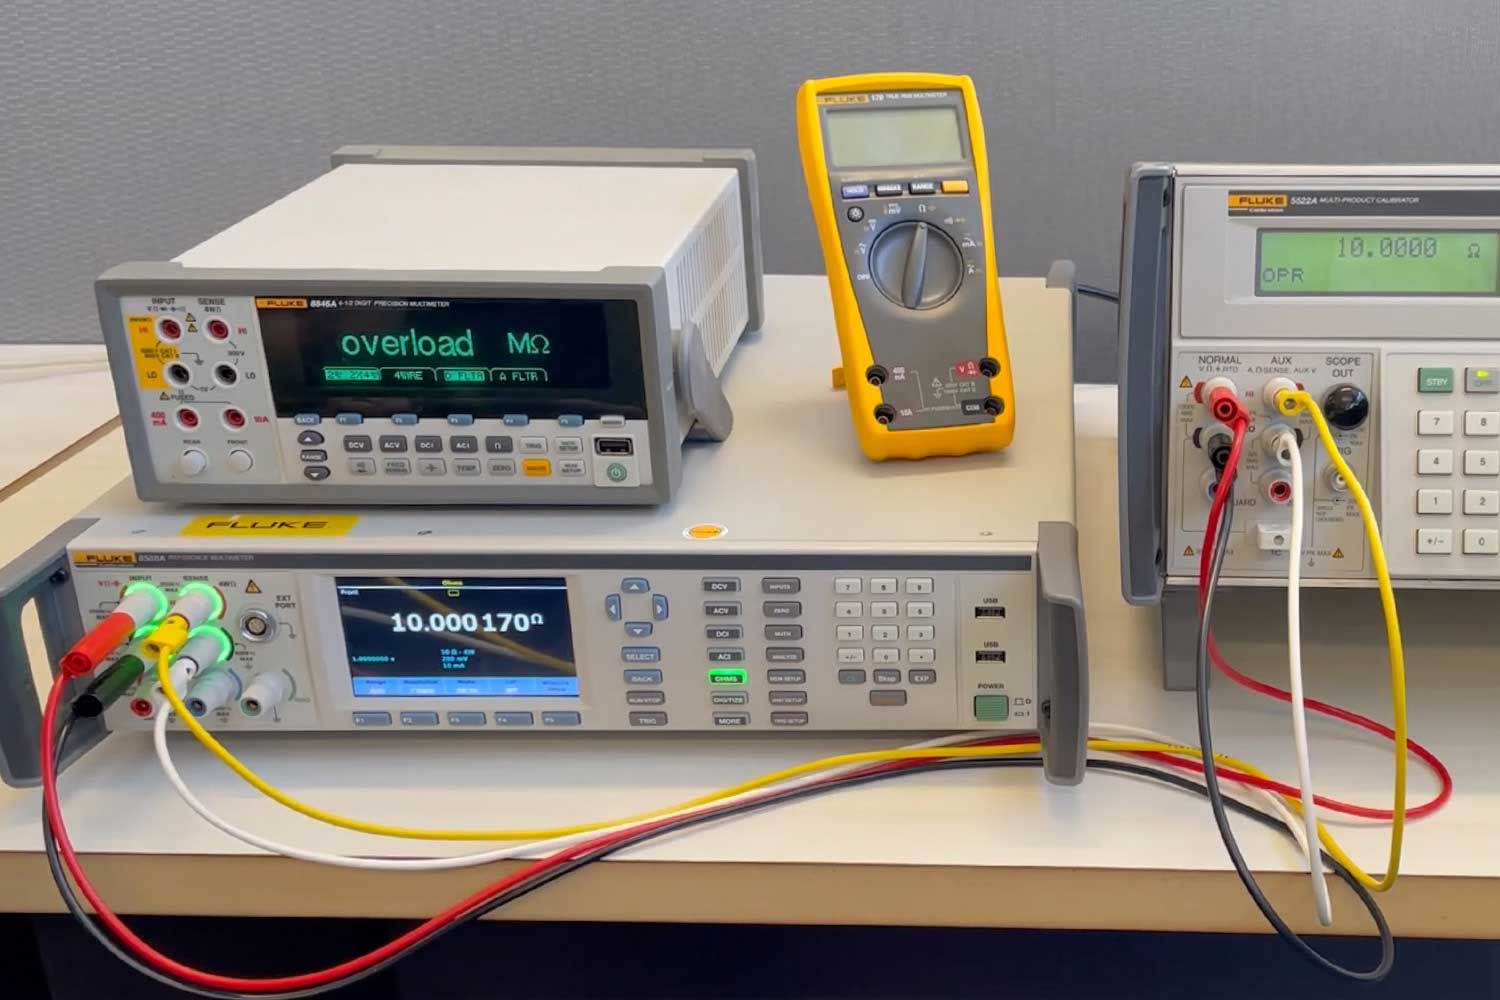
TruOhms tests are designed to eliminate errors due to thermal EMFs within the connection leads. These voltages are generated when two dissimilar metals are in contact and there is a thermal differential. In most laboratory settings, the temperature is stable enough that these EMFs aren’t huge, but for temperature measurements with one end of your probes in a heat source you can see substantial EMFs.

The meter is changing the polarity coming out of the excitation leads and reversing them. By doing that and making two measurements, the multimeter is able to remove variations due to thermal EMFs.

Keep learning

  • Active resistance with Wally Miller
  • About Calibration
  • How to Measure Resistance with a Digital Multimeter

Speak with a specialist

Related products

Calibration tools

  • 5522A Multi-Product Calibrator
  • 8588A Reference Multimeter
  • 8845A/8846A 6.5 Digit Precision Multimeters

Fluke tools

  • Fluke 179 True-RMS Digital Multimeter
Wally Miller
Posted by Wally Miller on May 10, 2022
Wally Miller is a Product Program Manager in the Calibration group. He has more than 35 years of experience in the Calibration and Test and Measurement industries. He has held many roles at Fluke in Engineering, Marketing, Sales and Management. . He holds a BS in Electrical Engineering and an... Full Bio
  • Home
  • Products
    • New Products
    • Electrical Calibration
      • Electrical Standards
      • Electrical Calibrators
      • Bench Multimeters
      • Electrical Calibration Software
    • RF Calibration
      • RF Reference Sources
      • RF Calibration Accessories
      • RF Calibration Software
    • Data Acquisition and Test Equipment
      • Bench Multimeters
      • Data Acquisition
      • Data Acquisition Software
    • Temperature Calibration
      • ITS-90 Temperature Standards
        • ITS-90 Fixed-point cells
        • Standard Platinum Resistance Thermometers
        • Maintenance Apparatus
        • Liquid Nitrogen Comparison Calibrator
        • Resistance Bridges
        • Standard Resistors
      • Calibration Baths
        • Compact Calibration Baths
        • Standard Calibration Baths
        • Special Application Baths
        • Bath Accessories
        • Bath Controllers
        • Bath Fluids
      • Industrial Calibrators
        • Field Metrology Wells
        • Metrology Wells
        • Handheld Calibrators
        • Field Dry-Block Calibrators
        • Micro Baths
        • Infrared Calibrators
        • Thermocouple Furnaces
        • Dual Block Dry-Well
        • Zero-point Dry-Well
      • Probes / Sensors
        • Platinum Resistance Thermometers (PRTs)
        • Thermistors
        • Thermocouples
      • Digital Thermometer Readouts
      • Multifunction Calibrators
      • Temperature Calibration Software
    • Humidity Calibration
      • Humidity Generators
      • Humidity Data Loggers and Monitors
    • Pressure Calibration
      • Piston Gauges
        • NMI Piston Gauges
        • Absolute Piston Gauges
        • High Pressure Pneumatic Piston Gauges
        • Hydraulic Piston Gauges
        • Piston Gauge Accessories
      • Automated Pressure Controller / Calibrators
        • Low Pressure Controllers / Calibrators
        • Pneumatic Pressure Controllers / Calibrators
        • High Pressure Pneumatic Controller / Calibrators
        • Hydraulic Controller / Calibrators
      • Pressure Monitors
        • Low Pressure Monitors
        • Digital Pressure Gauges
        • Reference Pressure Monitors
      • Deadweight Testers
        • Pneumatic Deadweight Testers
        • Oil Deadweight Testers
        • Water Deadweight Testers
        • High-Pressure Hydraulic Deadweight Testers
        • Deadweight Tester Accessories
      • Manual Pressure Calibration
        • Pressure Calibrators
        • Pneumatic Pressure Control
        • Hydraulic Pressure Comparators / Pumps
      • Handheld Pressure Calibrators
      • Air Data Calibration
      • Environmental Monitors
      • Pressure Calibration Accessories
      • Pressure Calibration Custom Systems
      • Pressure Calibration Software
    • Flow Calibration
      • Gas Flow Standards
      • Gas Flow Accessories
      • GFS Primary Gravimetric Flow Standard
      • Flow Calibration Software
    • Process Calibration Tools
      • Temperature Calibrators
        • Handheld Temperature Calibrators
        • Dry-Block Calibrators and Micro-Baths
        • Precision Digital Thermometers
        • Temperature Probes
        • Infrared Calibrators
        • Hygro Thermometer with Data Logging
      • Pressure Calibrators
        • Digital Pressure Calibrators
        • Handheld Pressure Calibrators
        • Deadweight Testers
        • Precision Digital Pressure Gauges
        • Calibration Hand Pumps
      • Multifunction Calibrators
      • mA Loop Calibrators
      • Process Calibration Software
    • Calibration Software
      • MET/CAL® Software
      • MET/CAL® Support
      • Asset Management Software
      • Temperature Calibration Software
      • Pressure Calibration Software
      • Flow Calibration Software
      • Mechanical / Dimensional Calibration Software
    • Service and Support
    • All Calibration Instruments
    • Handheld Test Tools
  • Purchase Info
    • Where to Buy
    • Request a Quote
    • Request a Demo
    • Request a Sales Consultation
    • Certified Pre-Owned Equipment
    • General Services Administration (GSA)
    • Financing Program
    • National Stock Numbers (NSNs)
    • Payment Options and Tax Info
  • News
    • Press Releases
    • Promotions
    • Industry Links
    • Metrology Salary Survey
  • Training and Events
    • Conferences and Exhibitions
    • Training Courses
    • User Group Meetings
    • "How To" Seminars
    • Web Seminars
      • Live Seminars
      • On-Demand Seminars
  • Literature and Education
    • Education Hub
    • About Calibration
    • Articles and Education
    • Product Literature
    • Product Manuals (User Guides)
    • Videos and Virtual Demos
    • Resource Centers
    • Blog
  • Service and Support
    • Service Request (RMA)
    • Service Plans
    • Technical Support
    • Knowledge Base
    • Accreditations
    • Authorized Service Centers
    • Calibration Certificates
    • Community Forum
    • My MET/SUPPORT
      • Activate
      • Procedures
      • Software
      • Technical Bulletins
      • Priority Support
      • Manuals
    • Product Manuals (User Guides)
    • Safety Data Sheets (SDS)
    • Safety, Service, and Product Notices
    • Software Downloads
    • Tools
      • PT100 Calculator
      • PT100 Table Generator
      • ITS-90 Reference Function Calculator
      • Thermocouple Table Voltage Calculator
      • Thermocouple Voltage to Temperature Calculator
  • About Us
    • Contact Us
    • Visit Us
    • Employment
    • Fluke Calibration
      • Hart Scientific Temperature Calibration
      • DH Instruments Pressure and Flow Calibration
      • Pressurements Pressure Calibration
      • Ruska Pressure Calibration
    • Fluke Companies
    • Integrity and Compliance
    • Frequently Asked Questions
    • Why buy Fluke Calibration ?
Home|Blog|How to remove additional errors when calibrating resistance
©1995-2023 Fluke Corporation
             

Secondary menu

  • Disclaimer
  • Privacy Statement
  • Terms of Use
  • Terms of Sale